Monday, February 22, 2010

Pseudo-"Cream" Sauce: Chicken in Mushroom Sauce!

One of the hardest things about cooking dairy-free is not being able to have creamy sauces because, of course, they have cream in them.  That's why, every once in awhile, I have to ditch Joe and go eat a cheesy, creamy, super unhealthy pasta dish that would probably make a gluten-free, dairy-free eater sick just by looking at it. 

Don't tell him I told you that- he'll get jealous of my love affair with cheese.

(Psst... One time, when Joe was a kid and could still eat dairy, he asked his mom if his middle name could be "cheese" on his L.L. Bean backpack because he doesn't have a middle name.  Adorable.)

So anyways, a couple of months back, we tried this recipe for Chicken in Mushroom "Cream" Sauce from Carol at Simply...Gluten Free.  I actually found the recipe on GoDairyFree.org because, funny thing, it's dairy free also!  It uses coconut milk instead of regular milk, so it gives that creamy texture while adding a delicious coconut flavor as well!  We tried it again last week and I dare say that it was even better than the first time.  Seriously, we ate our leftovers about an hour or two after eating it the first time.  Which sort of defeats the point of "leftovers."

We really like food, if you couldn't tell.  Especially mushrooms.

---------------
What you'll need...
  • Four boneless, skinless chicken breast halves
  • 1 medium onion, chopped
  • 2 cloves garlic, minced
  • 8 ounces mushrooms, sliced
  • 1/2 cup plus 2 tablespoons chicken broth (GF or not - whatever you need)
  • 1 cup coconut milk
  • 1 tbsp. fresh thyme
  • Salt and pepper
  • 2 tbsp. cornstarch
  • Extra virgin olive oil
---------------
How to make it:

1)  Season the chicken on both sides with salt and pepper.  Since it's going to have the mushroom sauce over it, you don't need to worry about seasoning it too heavily.


2)  Heat olive oil in a pan over medium heat and cook chicken breasts (about 5 minutes on one side, 3-4 on the other, depending on the thickness of your chicken).  When they are cooked through and browned on both sides, transfer to a plate and cover with tinfoil. 


3)  Add a little more oil to the pan (if needed) and turn heat down to low.  Add the chopped onions and cook until onions are soft and beginning to caramelize (only a few minutes; they will cook more later).


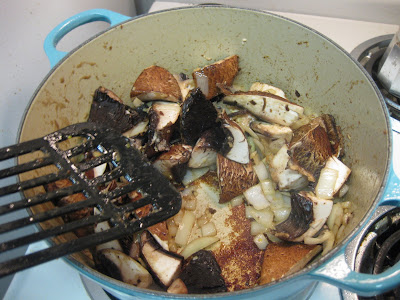
4)  Add garlic and cook for about 30 seconds (don't let it burn!)  Add the mushrooms and cook for a few minutes until browned and a little soft.

 
Pow!  Throw the mushrooms into the pan and stir!

  
This is what they will look like after cooking a little.
Courtney.  Do.  Not.  Eat.
It's so difficult to resist!
 
5)  Add 1/2 cup of chicken broth and cook for about a minute, until the chicken broth has reduced by half(ish).  You can also season with a little salt and pepper now, but I waited until after I added everything else. 

Post-reduction.
Sorry for the blurriness.
And for the lack of a pre-reduction picture.  I was conserving battery.


6)  Now it's time for the coconut milk; you're going to stir in one cup of it and heat for 2 minutes.

Don't be worried if you open your can and it looks like this:
It's supposed to be like that!  The first time I made this recipe, I had to Google whether this was normal.  I was really worried that the store had sold me bad coconut milk.

Just stir it...

And it will look like this!  No more chunks.
Chunks = bad.

  
Look at those bubbles! This sauce is almost ready.
I wish my camera could send smells because at this point, it smelled really good.


7)  Then you can add in fresh thyme (you can also add tarragon, as the original recipe says, but I don't like it.  I also don't like licorice, which is what tarragon tastes like to me).  At this point, you can check to see if it needs salt and pepper- just don't over-salt it, like I did.

  
See the little green thing in there?  It's thyme.
 Can't see it?  Just trust me. 


8)  Thoroughly mix together the other 2 tbsp of chicken stock with the 2 tbsp of cornstarch until there are no lumps.  Stir into the sauce and cook until it thickens.

  
Finished sauce!
Now it's time to eat, yum yum!


9)  To serve, spoon as much or as little sauce as you would like onto a chicken breast.  And here's the finished product: 

  
It was really tortuous to take this picture; all I wanted to do was EAT!

---------------
Recipe Review:

Man, is this recipe good.  It has MUSHROOMS and ONIONS and tastes slightly coconut-y too!  And I swear, your roommates will die from the smell of it; you'd better hide your leftovers, if you have any.  Even if you're not GF/DF, you need to try this recipe.  It is an A+++!

---------------
For next time...
  • If you like tarragon, use that too!  I've already stated my opinions...
  • If your name is Courtney and you used too much salt, use less salt next time
  • You can also serve this over rice or pasta; or, maybe you want to cut up the chicken and make it the entire sauce for the pasta!  An interesting idea...

I promise to make the pictures less blurry next time; anyone have any suggestions for a digital camera in terrible lighting?

"Sau-fried" Asparagus

I don’t like to eat fried food.  Well, who are we kidding here?  I love fried food.  But I always feel terrible after, so I try not to eat it that much.  Except on long weekends.  And after 1am.  I’m such a sucker.

One of my healthier food weaknesses is asparagus, but it can be a little bitter if you don’t cook it well.  So, on Valentine’s Day, when Joe brought out the asparagus, I knew the meal was going to be delish.  He doesn’t eat fried food at all, so he made them in a cross between sautéed and fried – or, what I like to call, “sau-fried!”

Here you have it… Sau-fried Fresh Asparagus.

---------------
What you’ll need:
  • Fresh asparagus
  • Extra virgin olive oil
  • Seasoned salt
  • Garlic powder
  • Onion powder
  • Paprika
  • Pepper
  • Any other spices you like!
---------------
How to make it:

1)  Prep the asparagus by washing it and cutting off any really hard parts at the bottom.  Don’t get rid of too much, though!

2)  Drizzle a little olive oil over the asparagus, just enough to coat the stalks.  Put some in a nonstick pan, too – enough to cover the bottom of the pan.

3)  Sprinkle a good amount of the spices over the asparagus (it depends on your taste whether you want more or less).  Toss with your hands to coat.

4)  Once the oil is heated up (over medium heat) put the asparagus in the pan in a single layer.  You want to make sure all of the asparagus is in oil!

5)  Keep checking the asparagus while it’s in the oil with a spatula until it has wilted some and it really soft.  It will be “droopy” and crunchy all at the same time once you let it sit on a plate! 

WARNING: You may be tempted to eat these with your hands.  That is MORE than fine, but make sure you don’t burn yourself!

---------------
Recipe Review:

YUM YUM YUM!  I love sau-frying these asparagus stalks because it’s part crunchy and part soft and wilty.  They aren’t quite “asparagus fries,” but they’re different from sautéed asparagus, too.  Seriously, I could eat these every day, and if I got to the grocery store enough, I might.

Since we’re talking about becoming undergrad gourmets, here, I decided to try a different rating system.  Therefore, I give this recipe an A+!

---------------
For next time…
I wouldn’t change anything!  But maybe you want to try a little spice with cayenne or chili powder, if you’re daring like that.  Don’t give that idea to Joe… then I’ll have to make it for myself!

Wednesday, February 17, 2010

"Dressing" Up the Salad

The one thing that I do miss about not going to the Fordham cafeteria anymore is the salad bar.  I know that sounds silly, but since I was a little kid, I have been a sucker for the salad bar.  Granted, I usually grabbed somewhere around three leaves of lettuce and covered the plate in other vegetables, but I will say that I have learned to embrace lettuce much more in recent years.

Our relationship is a good thing.

With that note, this entry is pretty simple, but it's a two-fer, so it makes up for the simplicity.  First, we'll make a Basic Balsamic Dressing, which was actually Joe's idea, and then we'll make an Apple-Walnut Salad to go with the dressing, which was also Joe's idea.  Basically, what I'm saying is that Joe does the cookin', I do the writin'.  For this entry, at least.

---------------
Here's everything you'll need for both recipes:

  - Some good balsamic vinegar (I found mine at Tino's Deli on Arthur Ave for only $4!)
 - Extra-virgin olive oil (get a decent quality one; it doesn't have to be super fancy, but you'll taste it in the dressing)
 - Honey
 - Fresh lemon juice
 - Salt and pepper
 - 1 Fuji apple (or your favorite kind)
 - Chopped or whole walnuts
 - Baby spinach leaves, washed (or whatever kind of lettuce you like)

---------------
What to do for the dressing...

1) The basic ratio for vinegar-to-oil in this dressing is 1-to-3.  So, let's start off with 1/2 cup balsamic vinegar in a bowl.


2) Now, while whisking the vinegar with a fork, slowly pour 1.5 cups of oil into the vinegar.  Keep whisking while the two incorporate.

3) Here comes the "hard" part... the amount of honey, lemon juice, salt, and pepper are up to you!  Start off with a little honey and lemon and adjust it to taste.  Because we didn't measure anything, I have no idea what measurements we actually used!  Maybe one of these days I'll recreate it and let you know.

---------------
What to do for the salad...

This is super easy, so no steps needed...

Slice your apple up into very thin pieces (the thinner the better!).  Place some spinach onto a place, apple slices over it, and walnuts on top.  Drizzle some of your homemade balsamic dressing over the top and voila!  Delicious Apple-Walnut Salad.

 
This is pre-dressing, but you get the idea.

One of these days I'll have a Balsamic-Mustard Dressing for you too... so try this one in the meantime and be on the lookout!  You can add almost anything to this salad... so let me know what you add!

Monday, February 15, 2010

Beef and Mushroom Stew, aka, The Perfect Snow Day Food

I'm not sure about you, but I hate the cold.  Hate it.  I was born and raised in New England, and I still have no tolerance for bitter winter cold.  So when I knew it was going to snow last week, I rushed out and got ingredients to make this deliciouso Beef and Mushroom Stew.  Actually, I made Joe run out and get the ingredients.  But I came up with the idea, so it's the same thing, right?

My obsessive need to make this stew came out of my obsessive need to read The Pioneer Woman every day.  Now that I've introduced you to it, I'm sure you are obsessed, too.  And if you still haven't gone to The Pioneer Woman, go.  Here.  Now.

Thank you, Ree Drummond (aka, the Pioneer Woman), for your wonderful Beef and Mushroom Stew.  And thank you, Google, for teaching me how much oil and cornstarch to use in substitution for butter and flour.  Because of course, I couldn't have convinced Joe to go to the store for me (in the bitter cold) if he couldn't eat the finished product.

Compromise- it's a beautiful thing.

So, here it is - my gluten free, dairy free version of the Beef and Mushroom Stew:

---------------
What you'll need:

  •  2 pounds of stew beef (you might want to cut the chunks in half if they're too big)
  •  2 tablespoons cornstarch
  •  5 tablespoons olive oil
  •  2 whole shallots, diced
  •  3 cloves garlic, minced
  •  8 ounces cremini or white button mushrooms (or portobello, cut into chunks)
  •  1/2 cup red cooking wine (or real wine- but it's up to you)
  •  1/2 can beef broth (GF) or about 300 mL
  •  Water, equal to the amount of beef broth
  •  Salt and pepper
  •  GF Pasta or rice
  •  2 sprigs fresh thyme
  •  1 tablespoon cornstarch
---------------
How to make it:

1)  Put meat in large mixing bowl and sprinkle cornstarch over it.  Toss meat with your hands to coat (don't worry about getting messy, it's part of the process!).


2)  Pour oil into heavy pot or Dutch oven and warm.  Brown meat over high heat in batches and place on a plate, covered, when done.


The meat and I got into a little tiff at this part because it kept splattering me.
Don't worry, it made up for that later.
...when I ate it.


3)  Add shallots and garlic to the pot, without cleaning (I didn’t have any shallots, so I used small onions.  They work just as well).  Sauté for 2 minutes over medium heat.
Mmm, look at all that yummy meat goodness.  Perfect for sautéing delicious onions and garlic.
I love onions and garlic.


4)  Add mushrooms and cook for 2 minutes.
Not ready


 Ready

5)   Pour in wine, broth, and water, plus add a little salt and pepper, to taste.
 
Adding salt and pepper is really just a chance to sneak a little taste...
The more tasting, the better.
6)  Bring to a boil, and add the meat back into the pot (with all of the yummy juice!).  Reduce heat to low.

 
Meat, meet mushrooms.  I think you two will be very happy together.
Says my tummy.


7)    Add thyme sprigs to pot.  Cover and simmer for 30 to 45 minutes.

All ready to simmer.
Simmer well, friends.

 Bye-bye for now.
It's a sad farewell.
But we shall meet again.


 Back so soon?!
(I forgot the thyme)
((You can put in extra thyme if you want))
(((If you're feeling really thymey, that is)))


8)  After the stew is done simmering, mix one tablespoon cornstarch with a little water until there are no lumps.  Stir it into the stew and cook for 10 more minutes, to thicken.  Turn off heat and let sit for 15 to 20 minutes before serving.  The longer you let it sit, the more tender the beef will be!


Voila!  Beef and Mushroom Stew.
This picture does not do it justice, trust me.
So go make it yourself!

---------------
Recipe Review:

I first must say that I absolutely love mushrooms.  I could eat them for breakfast, lunch and dinner.  Therefore, this stew was perfect for me!  Although the beef wasn't really tender enough when I ate my first helping (I would have let it sit longer, but I was running off to rehearsal), after sitting on the stove with the heat turned off, the beef got super tender for leftovers!

But the real star of this meal was the broth.  When I tasted this broth, it was fall-on-the-ground, knock-your-socks-off delicious.  I think the reason is because everything is cooked in one pan, so all of the seared goodness of the meat is incorporated into the final product.

But really, this stew is really easy and incredibly flavorful, and you will thank yourself for making it.  A great staple means... A FULL FIVE STARS!

---------------
For next time...
I really wouldn't make very many changes to this, but you could...
  • Add a half cup more wine, a half cup more broth, and a half cup more water.  I love more broth, but you might have to check to see if it needs more seasoning
  • Add potatoes, carrots, or other kinds of veggies.  Honestly, I wouldn't because I love it how it is, but if you want to stretch it further that will help!

What's your favorite food to eat on snow days?

Sunday, February 14, 2010

Food. Photos. Enjoy.

To enhance your cooking experience, here are all of the photos that I have meant to upload but have not yet.  Instead of updating old entries with photos, I decided to post them all in one entry so that you all wouldn't miss them:

 
Honey Roasted Sweet Potatoes
Now that's what I'm talking about.  Honey, delicious.


Stir-Fry Lemon Chicken
Chicken.  Vegetables.  Sauce.  I can smell it now.


Tomato-Basil Sauce
Simple, yet oh so tasty.


There it is, my Valentine's Day gift to you.  If the recipes didn't convince you, this should.
Have a lovely day!

Monday, February 8, 2010

Blog Dedication: The blog that makes me want to abandon my city dreams and move down South

This entry is dedicated to my roommate Andrea, my friend Diana, and their favorite blog.

It all started when Andrea came home from the post office one day with the biggest and heaviest box that I have ever seen come to the Fordham mail room.  Low and behold, she had entered a contest (like she does every week) on a cooking blog and actually won a set of very heavy, very expensive, really turquoise cooking pots that will last until long after she is actually able to lift them.  After seeing this, of course I had to check out the blog for myself.  And I fell in love.

The Pioneer Woman is Ree Drummond, and her blog is both gorgeous and delectible.  She shares every aspect of her Oklahoma ranch life with her dedicated readers, chronicled in photos of her family and ranch, entries about her life, and even her own real-life love story.  But the pinnacle of Ree's blog is her cooking section, filled with the most delicious (and probably least healthy) recipes i have ever seen.

Take, for example, Andrea's birthday present to Diana (and everyone else at the party) last Wednesday: The Best Chocolate Sheet Cake. Ever.  I can completely attest to the fact that this cake was, indeed, the BEST chocolate sheet cake ON THE FACE OF THE PLANET!  It required dedication (on Andrea's behalf, not mine) but I think that it's fair to say that it was definitely worth it.  Since I don't have any pictures of our sheet cake, I will post Ree's from her website:


You cannot deny that you wish that cake was on a plate in front of you right now.  In fact, when we had it, it did not stay on our plates very long.  Just to make it easier, I will include the shortened recipe version below:
 
---------------
Ingredients 
For the cake:
  • 2 cups Flour
  • 2 cups Sugar
  • ¼ teaspoons Salt
  • 4 Tablespoons (heaping) Cocoa
  • 2 sticks Butter
  • 1 cup Boiling Water
  • ½ cups Buttermilk
  • 2 whole Beaten Eggs
  • 1 teaspoon Baking Soda
  • 1 teaspoon Vanilla
For the frosting:
  • ½ cups Finely Chopped Pecans
  • 1-¾ stick Butter
  • 4 Tablespoons (heaping) Cocoa
  • 6 Tablespoons Milk
  • 1 teaspoon Vanilla
  • 1 pound (minus 1/2 Cup) Powdered Sugar
 Preparation Instructions
1) In a mixing bowl, combine flour, sugar, and salt.

2) In a saucepan, melt butter. Add cocoa. Stir together.

3) Add boiling water, allow mixture to boil for 30 seconds, then turn off heat. Pour over flour mixture, and stir lightly to cool.

4) In a measuring cup, pour the buttermilk and add beaten eggs, baking soda, and vanilla. Stir buttermilk mixture into butter/chocolate mixture. Pour into sheet cake pan and bake at 350-degrees for 20 minutes.

5) While cake is baking, make the icing. Chop pecans finely. Melt butter in a saucepan. Add cocoa, stir to combine, then turn off heat. Add the milk, vanilla, and powdered sugar. Stir together. Add the pecans, stir together, and pour over warm cake.

6) Cut into squares, eat, and totally wig out over the fact that you’ve just made the best chocolate sheet cake. Ever.
---------------

And there you go, folks, straight from Ree's website.  I know you are all drooling and making grocery lists right now to run out and make this, but when you're done with that, check out The Pioneer Woman for yourself.  Ree also has a cookbook (which Andrea does own, thank goodness) and you can buy it for yourself if you want even more Southern deliciousness.  I think I may do just that, despite my wallet's objections.

To sum up: thank you, Pioneer Woman, for providing me with endless fantastic recipes and the desire to abandon my city career aspirations, move to the South, and stay at home cooking those recipes all day, every day.  For now, I will simply sit here and torture myself as I look through the "potato" section of the blog inconveniently during dinnertime.

Easy Tomato-Basil Sauce

Pasta is supposed to be the so-called “college staple,” but sauces from the supermarket can be expensive.  Since I wasn’t blessed to have grown up in a deeply Italian family with a homegrown pasta sauce, I am now forced to find my own recipes and test them out.  This one seemed easy and cheap, so I decided to give it a try.  Here is a recipe for a simple Tomato-Basil Sauce, taken from The Healthy College Cookbook again, with a few tweaks courtesy of yours truly!

---------------
What you’ll need:
  • 1 28 – 32 oz. can of diced tomatoes in olive oil and garlic (they don’t have to be the oil/garlic kind, but trust me, it makes the sauce a lot better!)
  • 5 garlic cloves, minced
  • 1 tablespoon dried basil (the original recipe calls for fresh basil, but dried is cheaper and easier to find)
  • Extra-virgin olive oil
---------------
What to do:

1) Saute garlic in olive oil over medium heat for about a minute.  Season with a pinch of salt and pepper.

Be sure not to burn the garlic – it can go from “lightly browned” to “burnt” quickly!

2) Add the tomatoes and simmer for about ten minutes, until the liquid has reduced some.  Stir occasionally.

3) Add the basil and stir well.  Season with salt, pepper, and garlic powder, if necessary, to taste.  Let simmer for a few more minutes.  Serve over pasta (or gluten-free pasta, to make it GF).

This sauce is a little chunky; if you want your sauce less chunky, take a potato masher or fork and mash down the tomatoes.

---------------
For next time…
  • Experiment with seasonings and the amount of each seasoning.  Since this dish is basic, almost anything will just add another dimension of flavor to the sauce
  • Get “petite” diced tomatoes to avoid so many chunks in the sauce

What kind of seasonings would you like to add to the sauce?  Do you have a pasta sauce that has been passed down in your family?

Saturday, February 6, 2010

Take Out, Take In - Part 2

Well, why not stay on the “fake Chinese food” tangent while we are here?  This Homemade Sesame Chicken recipe is super easy and super cheap, plus it makes a lot for leftovers!  It may not be exactly the same as takeout, but trust me, it is still delicious.  This was the first time I made this recipe, and it is from The Healthy College Cookbook (which is a fabulous cookbook, by the way – you should all get it!), but I did change it slightly.

For this recipe, I substituted chicken thighs for chicken breasts.  Although it wasn’t my idea, it was a tastier and cheaper alternative to chicken.  For instance, at my local grocery store, thighs are $2.99/pound as opposed to about $4.99/pound for breasts.  Yes, this does make the recipe slightly less healthy, but for me, it wasn’t too terrible to not justify the money and taste!

---------------
What you’ll need:
  • 4-5 boneless chicken thighs (or breasts, if you want to go healthy!)
  • 5 tablespoons honey
  • 4.5 tbsp sesame seeds
  • 1.5 tbsp garlic powder
  • 3/4 tbsp ground black pepper
---------------
How to make it:

1) Preheat oven to 350 degrees F.  Spray a casserole dish with cooking spray and lay chicken in one layer in the dish.

2) Warm honey slightly in the microwave so that it can be easily poured but is not too hot.  Pour or brush evenly over chicken.

If you are a big honey fan, it never hurts to add more!  Try to get a little on the bottom as well, or turn the chicken over in the middle of baking.

3) Mix together garlic powder, sesame seeds, and pepper thoroughly.  Spread over chicken evenly.

When I made this recipe, I didn’t mix everything together well enough and didn’t get the same amount of seasoning throughout the whole dish!  A good idea is to put the ingredients in a plastic container or bag, close it, and shake it well.

4) Bake for 30 – 35 minutes, until chicken is cooked through.  Serve over rice.

---------------
Recipe Review:

Although this recipe is a good start, it could use some adjustments.  The black pepper was overpowering at times, and there were way too many sesame seeds for my liking!  Also, I could have used some more “sweet” in my dish.  That being said, there was plenty of sauce to pour over my rice, and the use of chicken thighs really made a difference in the recipe.

Overall, if you are hoping for a sesame chicken recipe that tastes exactly like the real thing, you won’t get it here.  However, the “real thing” is also “really unhealthy” and costs much more than this homemade recipe.  I will probably make it again, but not for a little while (because I have so many leftovers still!).  Three stars.

---------------
For next time…
  • FEWER SESAME SEEDS!  I know it is called sesame chicken, but I felt like I had a mouthful of birdseed
  • To increase the sweetness of the dish, marinade the chicken in the honey for 15-20 minutes before putting it in the oven.  A little sugar might help, also
  • Add a little more garlic powder and lower the amount of pepper used.  A little salt couldn’t hurt, either

What do you think of this recipe?  What kind of chicken do you prefer – dark meat or white?

Tuesday, February 2, 2010

Take-out, Take-in

Although I do love Chinese takeout every once in awhile, the simple fact is that it is just not good for you.  Yes, we are college students, and yes, we can indulge ourselves (especially when Grey's Anatomy is airing this Thursday night at 9pm- not that I would ever sit through that overdramatized hour of television...), but there are alternatives to the greasy "mystery meat" that Chinese takeout provides us with.

Thus, we come to my next recipe, Stir Fry Lemon Chicken, courtesy of the book Cooking Free by Carol Fenster.  Although I will elaborate on this book down the road, I will note now that Cooking Free is a cookbook tailored to "people with food allergies and multiple food sensitivities."  Therefore, this recipe is also proof that it is possible to have a gluten-free, dairy-free, egg-free, potato-free, most-other-things-free meal that actually tastes good. 

Since this was my first time cooking this recipe, I want to make sure to take you along the cooking ride with me as I experienced it.  And thank you in advance to my boyfriend Joe for being my co-chef/model for most of these pictures (to be added soon!).

---------------
What you'll need:
  • 1 lb boneless chicken
  • 1/4 cup wheat free tamari soy sauce (or regular soy sauce, if you don't have to worry about wheat)
  • 1/4 cup lemon juice
  • 1/4 cup water
  • 1 tbsp lemon zest
  • 1 tsp honey
  • 2 tsp crushed red pepper flakes
  • 2 garlic cloves, minced
  • 1/2 tsp ground ginger
  • 1 tbsp olive oil
  • 3 green onions
  • 1/2 c red bell pepper
  • 2 large carrots
  • 2 tsp corn starch
---------------
How to make it:

1) Cut chicken into 1-inch pieces and put in a plastic container with a lid.

2) Combine soy sauce, lemon juice, water, lemon zest, honey, red pepper flakes, garlic, and ginger and mix thoroughly.  Pour half of the marinade into the chicken container and marinade for 30 minutes in the fridge.

3) While the chicken is marinading, cut carrots, onions, and bell peppers into bite-sized pieces.

4) Drain the marinade out of the chicken container.  Saute the chicken in the olive oil over medium heat until lightly browned.  Transfer to a plate and cover with aluminum foil

5) Saute the vegetables until they are tender.  Whisk the cornstarch into the other half of the marinade well and add to the vegetables.

6) Stir until sauce becomes thick.  Add chicken, cook for another minute or two, and serve over rice.

---------------
Recipe Review:
This recipe defies the stereotype that "cooking free," so to speak, means cooking flavor free.  The spices in this dish definitely create levels of flavor, ranging from sour to salty to a little bit of spice.

Although I should have expected it because the recipe includes red pepper flakes, the chicken was spicier than I thought it would be!  It definitely works well with texture and subtle flavor of basic rice, and adding a little salt to the rice added an extra pop as well.

My main criticism of this dish is the small amount of sauce that the recipe creates.  I like having a lot of sauce to mix in with my rice, and this recipe really didn't create much because the marinade reduced.

Also, as a personal preference, I don't like overly spicy food too much (other tasters insist that the dish was, in fact, not that spicy- I have sensitive taste buds), so I would have liked a little less spice in the dish.

Overall review?  This is a solid four stars; it has the potential to be even better with a few tweaks, plus it was food allergy-friendly, which is always a plus in my book because Joe can share it too!

---------------
For next time...
Since this was my first time making this dish, I would make some modifications to the recipe.  Here are some of them:
  • To create more sauce, don't drain the chicken from its marinade when browning it.  This may require a little more cornstarch later on, but only if necessary.
  • Because I'm a bigger fan of the salty to the spicy and sour, I would add a splash more soy sauce when cooking the vegetables and perhaps a pinch more salt.  I would also decrease the amount of red pepper flakes, but if you are a fan of spice, leave it in!
  • Add more of each kind of veggie, since you need to buy more than called for anyways.  You can also add other types of vegetables if you like- I love onions and mushrooms, so I would add those!  It will make your recipe stretch further and will add more texture contrast to the chicken.
 What are your favorite healthier alternatives to take-out?  Would you make this recipe?